Easy Make-Ahead Ham & Cheese Hawaiian Sliders
Make-Ahead Ham & Cheese Hawaiian Sliders are the perfect meal for game day, picnics, potlucks, or easy weeknight dinners! They are simple to make and only take 20 minutes to heat in the oven!! Definitely one of our family’s favorite freezer meals!!

Easy Make-Ahead Ham & Cheese Hawaiian Roll Sliders
These tasty make-ahead sliders are my go-to easy freezer meal pick for potlucks, picnics, family get-togethers – really anytime I need to take food for a crowd!
They are so easy to make, can be prepared in large batches, and they are out of this world delicious! Time and time again they have proven to be a successful crowd favorite.
There is just something uniquely delicious about the combination of salty ham, melted Swiss cheese, and tangy honey mustard sauce all wrapped in warm, sweet Hawaiian rolls that will have you, or your guests, craving more!
They also make for an easy weeknight dinner.
But the best part, for me as a busy mom, is that no kid has ever complained about having to eat these “mini sandwiches” – not even once – so that is a HUGE win at my house!

Ingredients for Make Ahead Sliders
There are a couple of options for this easy recipe, but let’s start with the basics.
For these make-ahead sandwiches, you’ll need:
- Hawaiian sweet rolls – I’ve used the brand name (King’s Hawaiian) and also several grocery store versions of sweet rolls before, and both have worked well. I don’t recommend trying to substitute dinner rolls here though.
- deli ham – thin sliced is better. I’ve used honey ham and black forest ham – either works great! You can even use slices of leftover ham too if you’re looking for ways to use up leftovers.
- sliced Swiss cheese
- honey mustard salad dressing – you can use a plain honey mustard here or even a dijon mustard if you prefer a more tangy taste. We just like the extra sweetness that the salad dressing lends.
For the delicious buttery sauce on top of the rolls, you’ll need:
- melted butter
- dry minced onions
- course-ground or stone-ground mustard
- poppy seeds (optional)
Preparing Your Hawaiian Sweet Roll Sliders
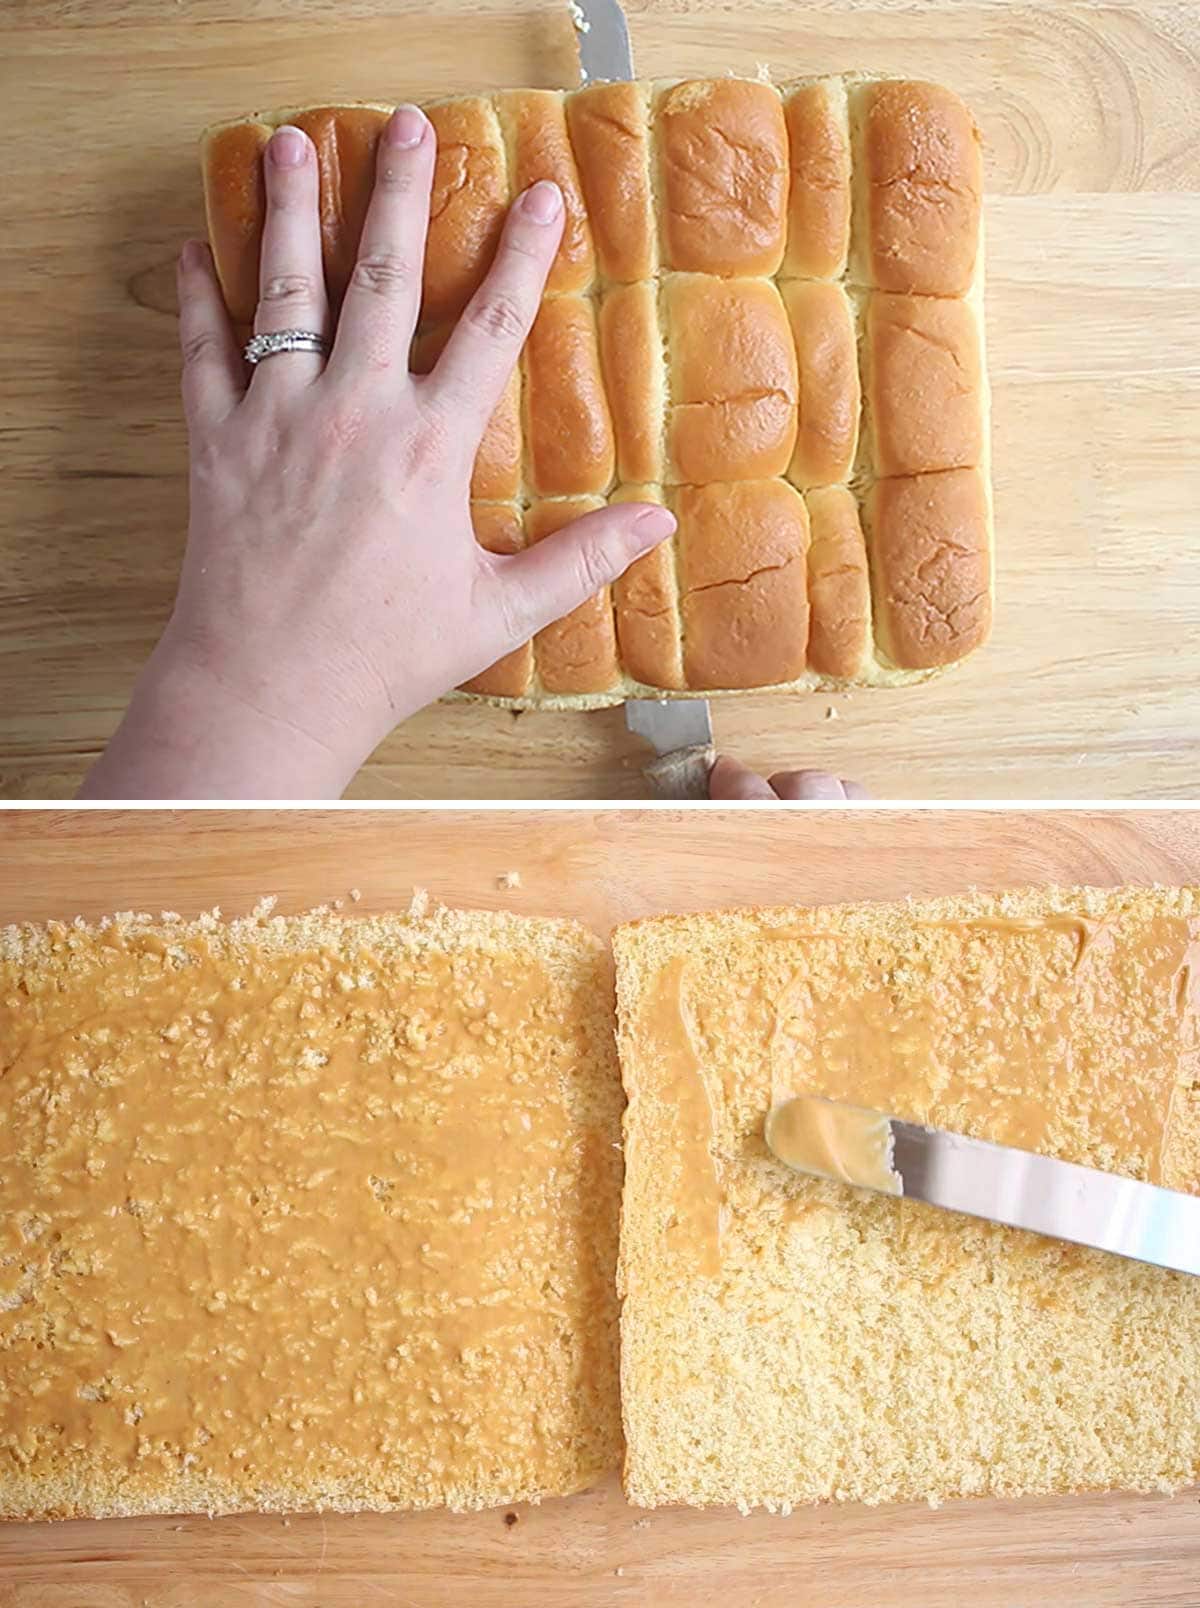
To start, remove any packaging from your slider rolls and carefully slice horizontally through the entire bunch. (Use a long bread knife or other serrated knife for best results, and be very careful not to cut yourself!)
You will then have one large top piece and one large bottom piece.
Gently separate your top and bottom pieces and lay them side by side.
Next, spread your dressing on both the top half of the rolls AND the bottom half of the rolls.
You can use a bottle of regular honey mustard here if you prefer. My family likes the honey mustard salad dressing because it is just a little sweeter.
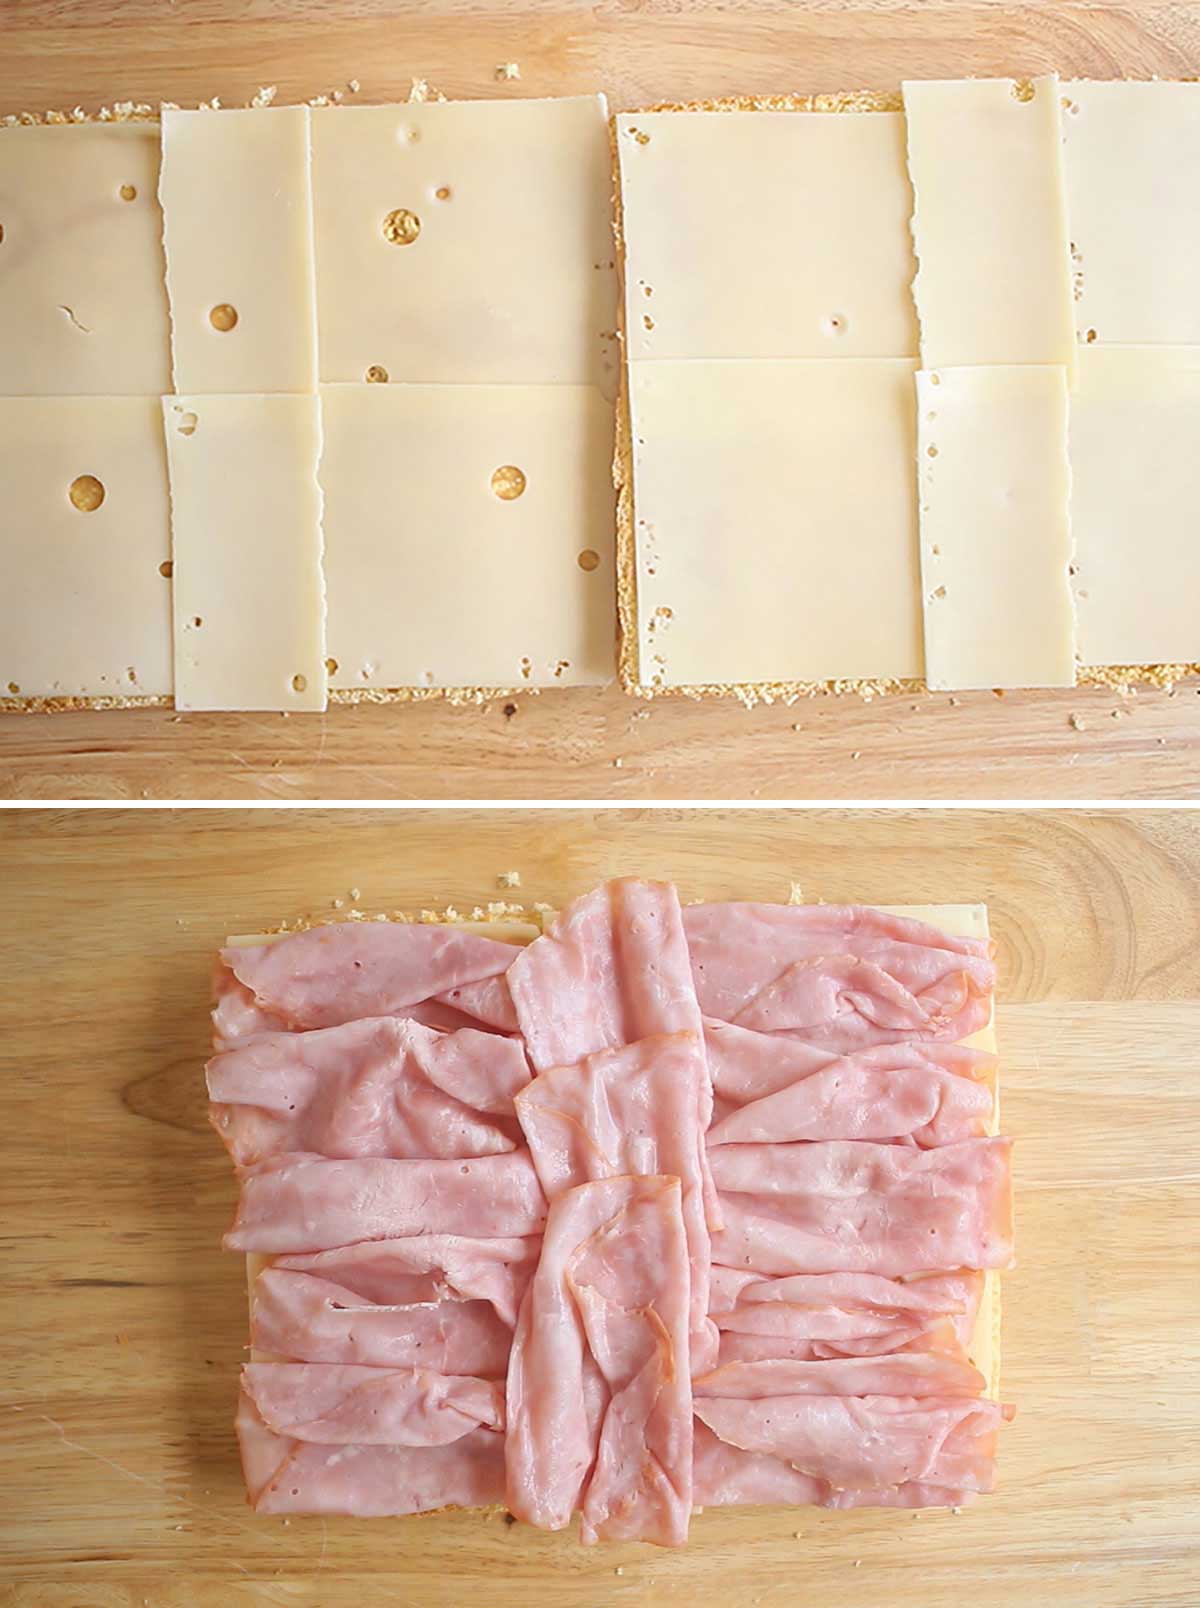
Next, lay out your pieces of cheese to cover your bread, again on both halves of the rolls. This will help protect the sliders from soaking up moisture from the meat and becoming too soggy.
Next comes the ham. Layer it on the bottom half of your rolls only.
I use an entire package, but you may opt to add less (or more) depending on your personal preferences.
If you are making these sliders for a potluck or outdoor picnic, you can fold the ham into smaller pieces to align with the individual rolls. This will make it so that the sandwiches can easily be pulled apart without as much cutting.
When we make these for home, I just lay the full slices of both meat and cheese on and then cut the sandwiches once they come out of the oven.
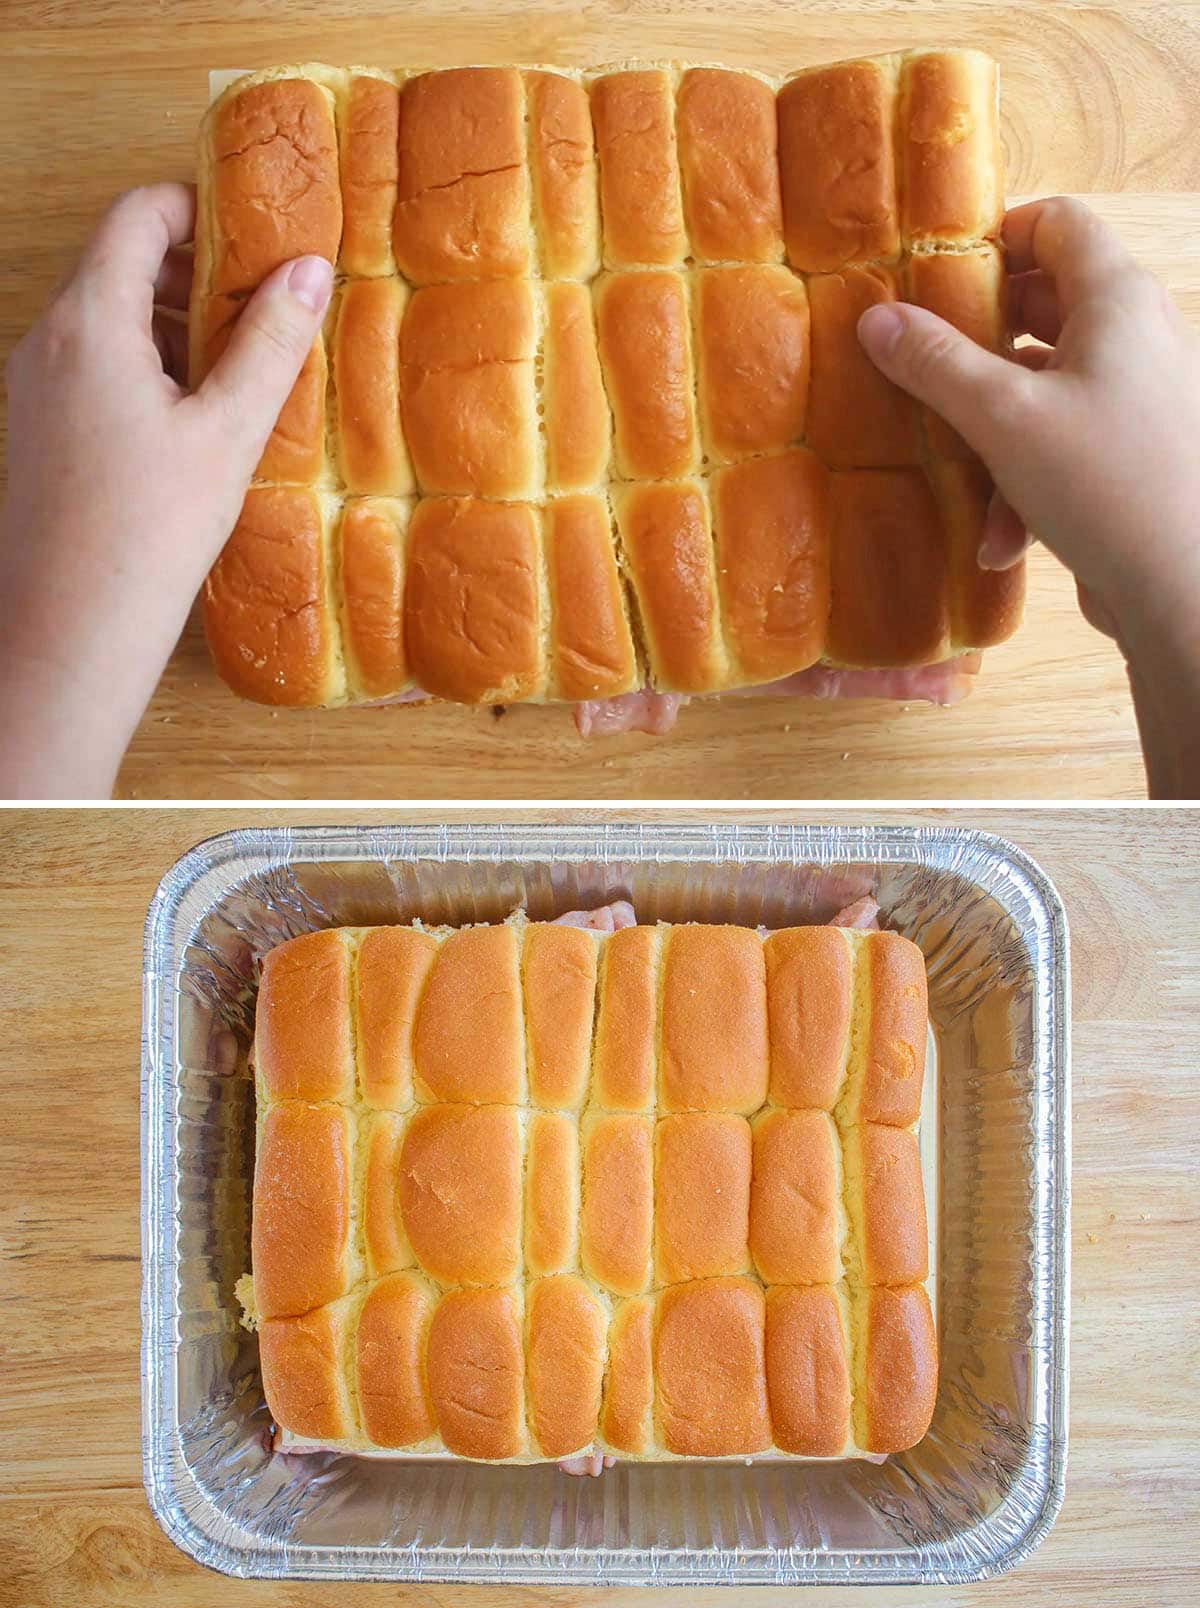
Once you have added the ham, gently flip your top portion of the rolls (with the cheese on it) and lay it over your bottom section, lining up the two halves as best you can.
Making Hawaiian Sliders Ahead of Time
To prepare these easy sliders as a freezer meal, your next step is to carefully pic up your giant “sandwich” and place it in a 9×13 dish that can go into the freezer.
I prefer to use aluminum steam table pans for this meal. They are 9×13 and about 3 inches deep. I find mine at Sam’s Club. But if you’re not a Sam’s Club member or don’t have one close by, you can find them online or at most restaurant supply stores. I’ve also seen them at dollar stores and Walmart, often labeled as a “roaster” pan.
If you want to skip the freezer and just make these right now (and who wouldn’t, I mean, really?), place them in a 9×13 prepared baking dish lined with aluminum foil. Or use a steam table tray here, too.
Make the butter sauce for the top of your sliders by melting your butter in a small bowl and then gently stirring in the minced onions, course-ground mustard, and poppy seeds (if you are using them).
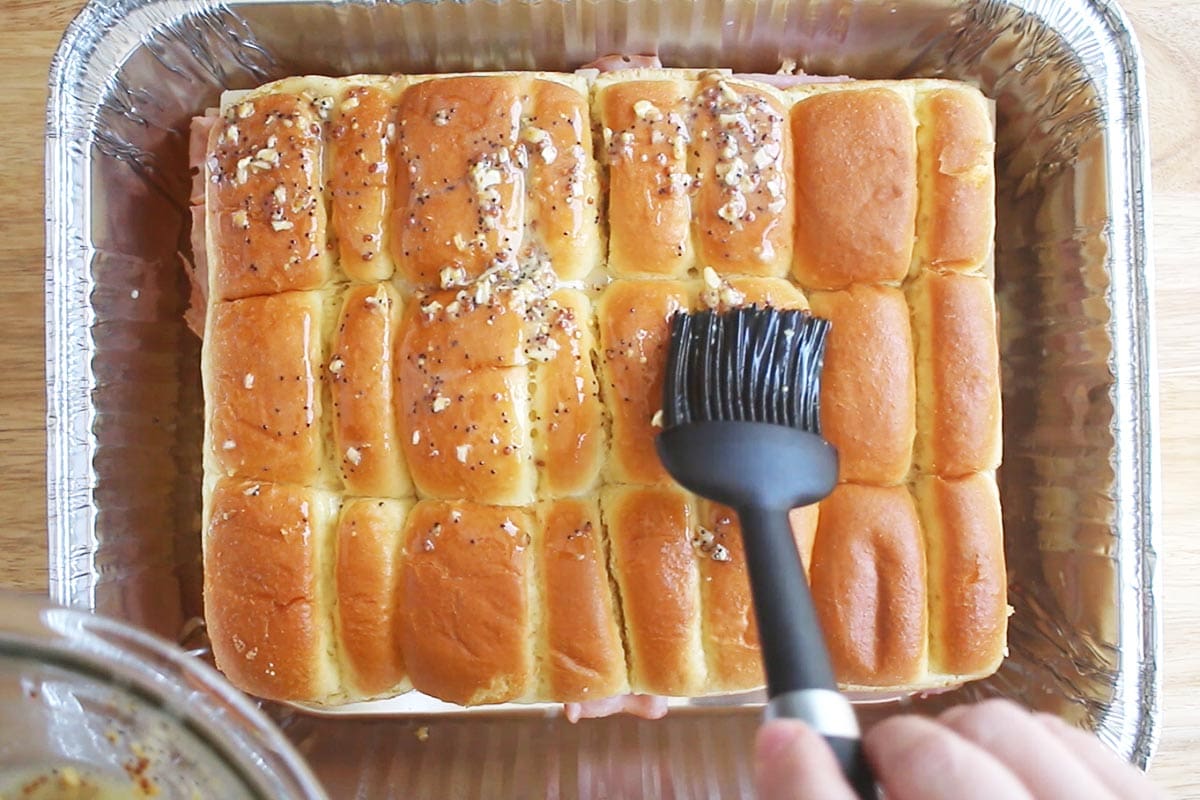
Use a pastry brush or silicone basting brush to spread the butter mixture all over the tops of the rolls.
Make sure not to leave any of that buttery deliciousness in the bowl – you want it ALL on those sandwiches, every last drop!
If you don’t have time or space to freeze them, you can also choose to make these easy sliders a day in advance and store them in the refrigerator and then bake the next day.
Freezing Your Make-Ahead Ham & Swiss Sliders
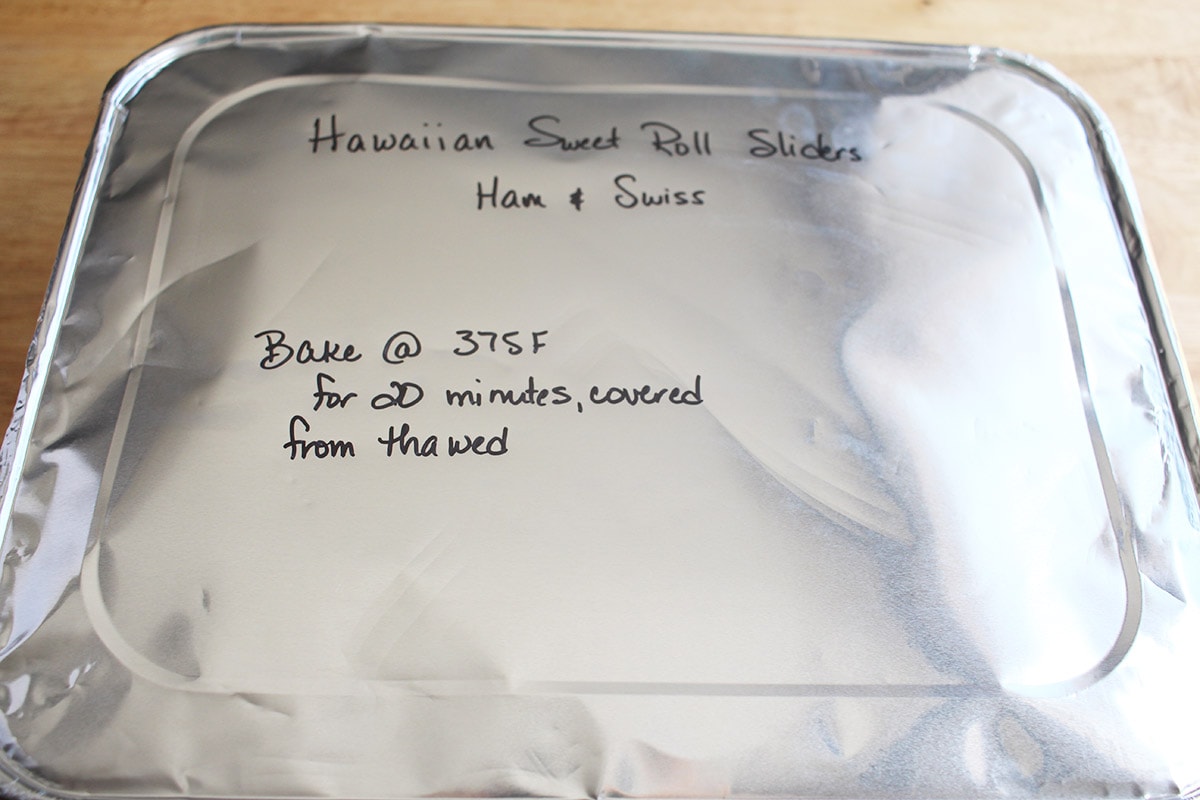
Now, simply cover your dish and label!
Sam’s Club also sells these aluminum lids for the steam table trays, but you can also just use regular ol’ aluminum foil and they will do just fine. No need to get fancy.
Be sure to include the date and reheating instructions if you are putting them in the freezer!
Your ham & cheese sliders will live happily in your freezer for up to 2 months. But once you tasted them, you’ll probably never have to worry about them staying around that long…

Heating your Make Ahead Hawaiian Roll Sandwiches
When you’re ready to feast, pull your tray of sliders out of the freezer and allow it to thaw in your refrigerator overnight. (These do MUCH better heated from thawed – I do not recommend trying to heat directly from frozen.)
The next day, simply pop the tray of sliders into the oven and bake, covered, in a preheated oven at 375 degrees Fahrenheit for about 20-25 minutes.
If you are skipping the freezing, then cover your slider sandwiches with a layer of aluminum foil and bake directly after preparing them. Same time and temperature as above.
Suggestions for Customizing
Although I used a lot of pictures to help show basic steps, these sliders really only take a few minutes to make!
Don’t be afraid to make some tweaks to this basic slider recipe – there are lots of different variations you could try, including:
- Turkey & cheddar – either as written or swap out the honey mustard sauce with pesto.
- Roast beef & cheddar – swap out the honey mustard sauce for horseradish. Yum!
- Chicken, bacon, & cheddar – use ranch dressing in place of the honey mustard.
- Thanksgiving sliders – use sliced turkey and add a layer of cranberry sauce between the cheese and meat (so it is not touching the rolls directly).
And if you aren’t a fan on onions, replace the minced onions in the topping with a dash of onion powder and a bit of Worcestershire sauce.

Sliders for One or Two
For a smaller freezer meal if you’re only cooking for one or two people, you can make these as written and then split the rolls into two smaller trays.
Check your grocery store or local dollar store as I’ve often had good luck finding trays that were about half the size of the 9x13s, which work perfectly for a half sheet of the sliders.
Another option is to make the full tray of sliders but then portion them into individual sandwiches. Store them in airtight containers. You can reheat in the microwave or use the air fryer for a crispier option.
FAQs
Yes, you can make them up to 24 hours in advance and keep them refrigerated. Just make sure to wrap them tightly in foil or store them in an airtight container to maintain freshness. You don’t want to make them more than 24 hours in advance as the quality will go downhill quickly and you risk getting sad, soggy sliders instead of toasty, melty goodness.
Yes, you can! I know it seems counter-intuitive, and that everything in you is screaming that there is no way these frozen sliders will be anything but a soggy and sad mess. But TRUST ME! If you follow the steps above, you will get delicious make-ahead sliders that turn out golden brown and toasty! I can’t explain the magic. (Well, I could, but you didn’t come here for a science lesson…) Just trust me on this one. Make a tray and try it out for yourself!
While you can technically use dinner rolls or even potato rolls as a substitute, the sweetness and soft texture of the Hawaiian rolls give these sliders and distinct flavor and appeal that you cannot get with other rolls, so I don’t recommend this particular substitution.
If you like these Hawaiian Sweet Roll Sliders, check out this recipe for Prep-Ahead Teriyaki Sliders with Broccoli Slaw for an interesting option – my family LOVES them!

Make Ahead Ham & Cheese Hawaiian Sliders
EQUIPMENT
- Aluminum Steam Table Trays
INGREDIENTS
- 1 package Hawaiian sweet rolls
- 9 oz deli ham thin sliced
- 10 slices Swiss cheese
- 1/2 cup honey mustard salad dressing or honey mustard
- 2 tablespoons butter , melted
- 1 teaspoon dry minced onion
- 1 teaspoon course-ground mustard
- 1/4 teaspoon poppy seeds
INSTRUCTIONS
- Remove rolls from package, lay flat, and slice in two (so you have one single top piece and one bottom piece). Separate and lay side by side. Spread with dressing.
- Layer Swiss cheese slices over both sections of sandwiches, covering as much as possible.
- Layer ham over the bottom section of sandwiches. Carefully pick up top and flip over onto bottom section. Place sandwich rolls into aluminum pan. (Or if baking fresh, place into foil lined 9×13 dish.)
- In small bowl, combine remaining ingredients and stir. Brush or pour over tops of sandwiches.
TO FREEZE:
- Cover aluminum pan tightly with lid or aluminum foil. Label (be sure to include reheating instructions.) Place in freezer and store up to two months.
TO REHEAT:
- Thaw overnight in refrigerator (skip this step if cooking from fresh).
- Bake in 375F oven, covered, for 20-25 minutes until centers are heated through and cheese has melted.


Look delicious! Can these be made the night before, refrigerated then cooked in the morning?
Absolutely! 🙂
I made this recipe for the family. They loved it!! I need to double it next time.
So glad everyone liked it!!
Can you make a slider for breakfast with eggs
Yes, absolutely! In fact, I think I’ll do just that – coming soon to the blog! 🙂
Hi! How can I keep these warm at an outdoor picnic after baking them at home ? Any tips are deeply appreciated 🙏
I would try putting them in a disposable catering or chafing dish with the little alcohol warmers underneath if possible. Grocery stores and Walmart or Target sell them as do some food club stores like Sam’s Club, or you can find them for fairly cheap on Amazon.
Walmart:
https://www.walmart.com/ip/10-Piece-Buffet-Set-Including-Fuel-Party-Supply-Set/1262822944?athbdg=L1103&from=/search
Amazon:
https://amzn.to/3L6GGP9
Sandwiches are quick easy and delicious. One caveat. 20 min at 375° would’ve given me hockey pucks. So glad I checked them at 8 minutes.